Guides
How to Use the Text Generator
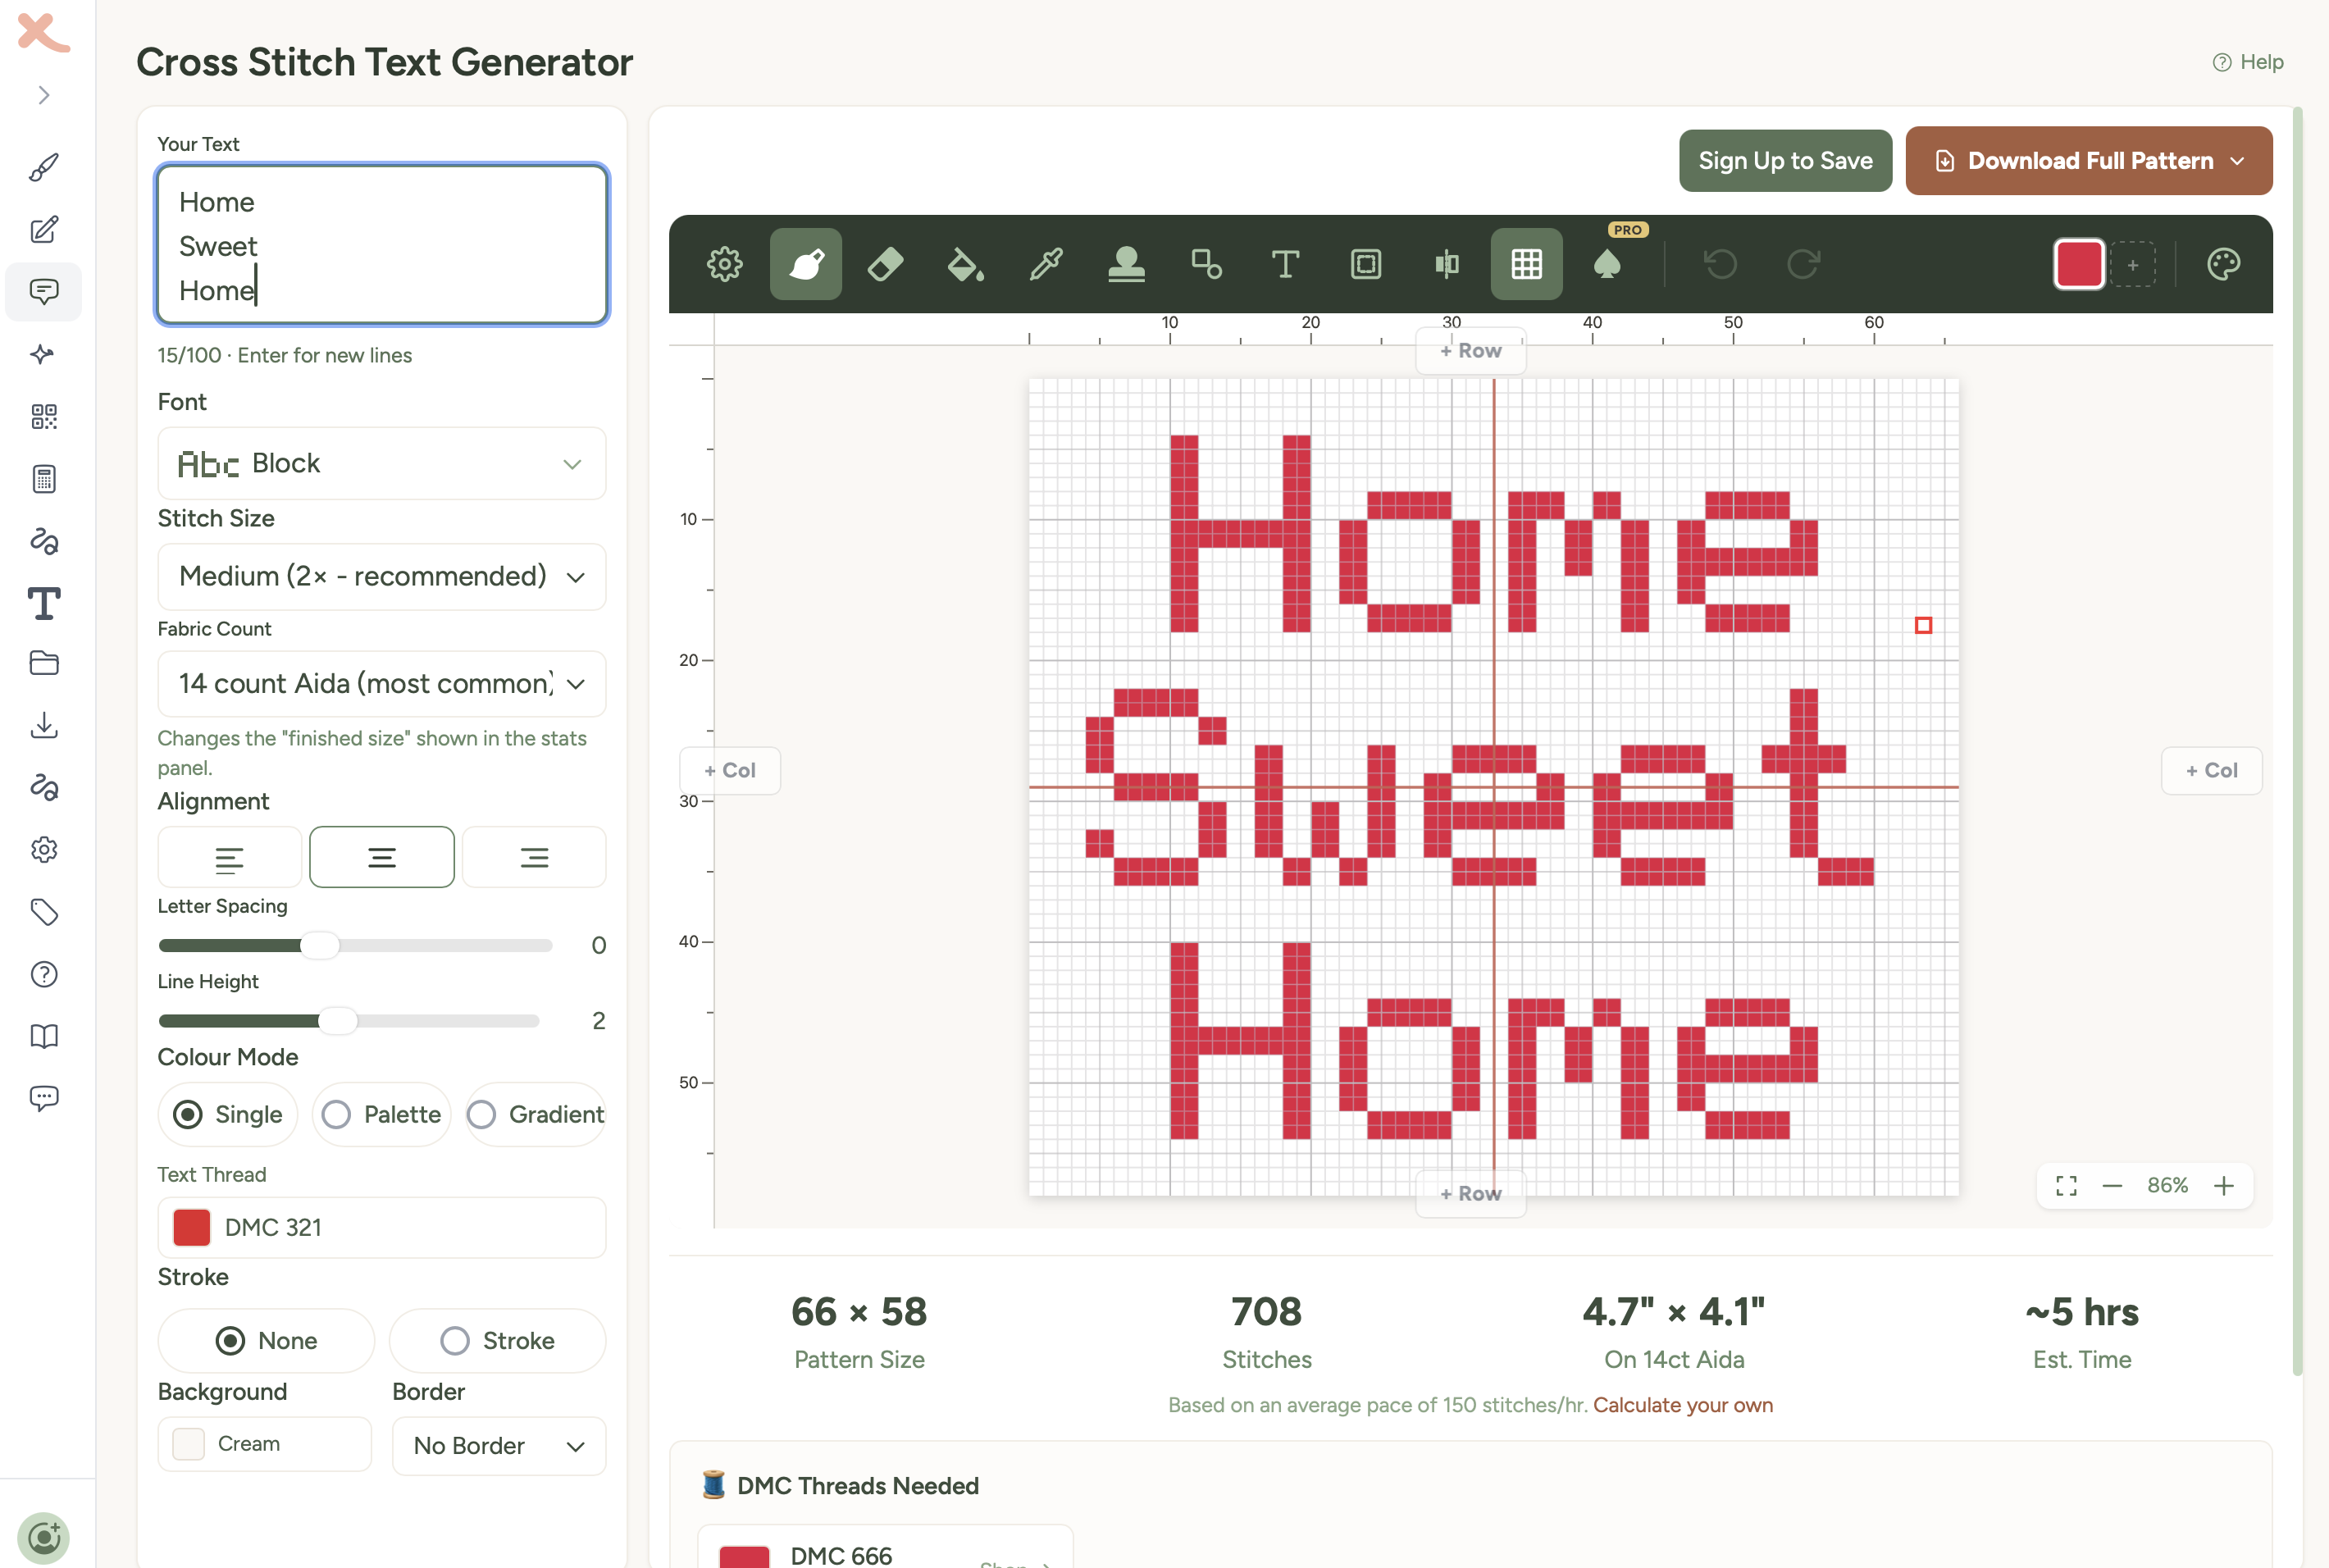
The Text Generator turns words into cross-stitch patterns. Type in a name, a date, a short quote, or a word in another language - whatever you like - pick a font, choose your colours, and you've got a pattern ready to stitch. It's one of the quickest ways to create something personal.
Typing your text
- Go to the Text Generator page.
- Type your text into the input box. You can enter up to 100 characters, and line breaks are supported - just press Enter to start a new line.
- The preview updates as you type, so you can see exactly what your pattern will look like.
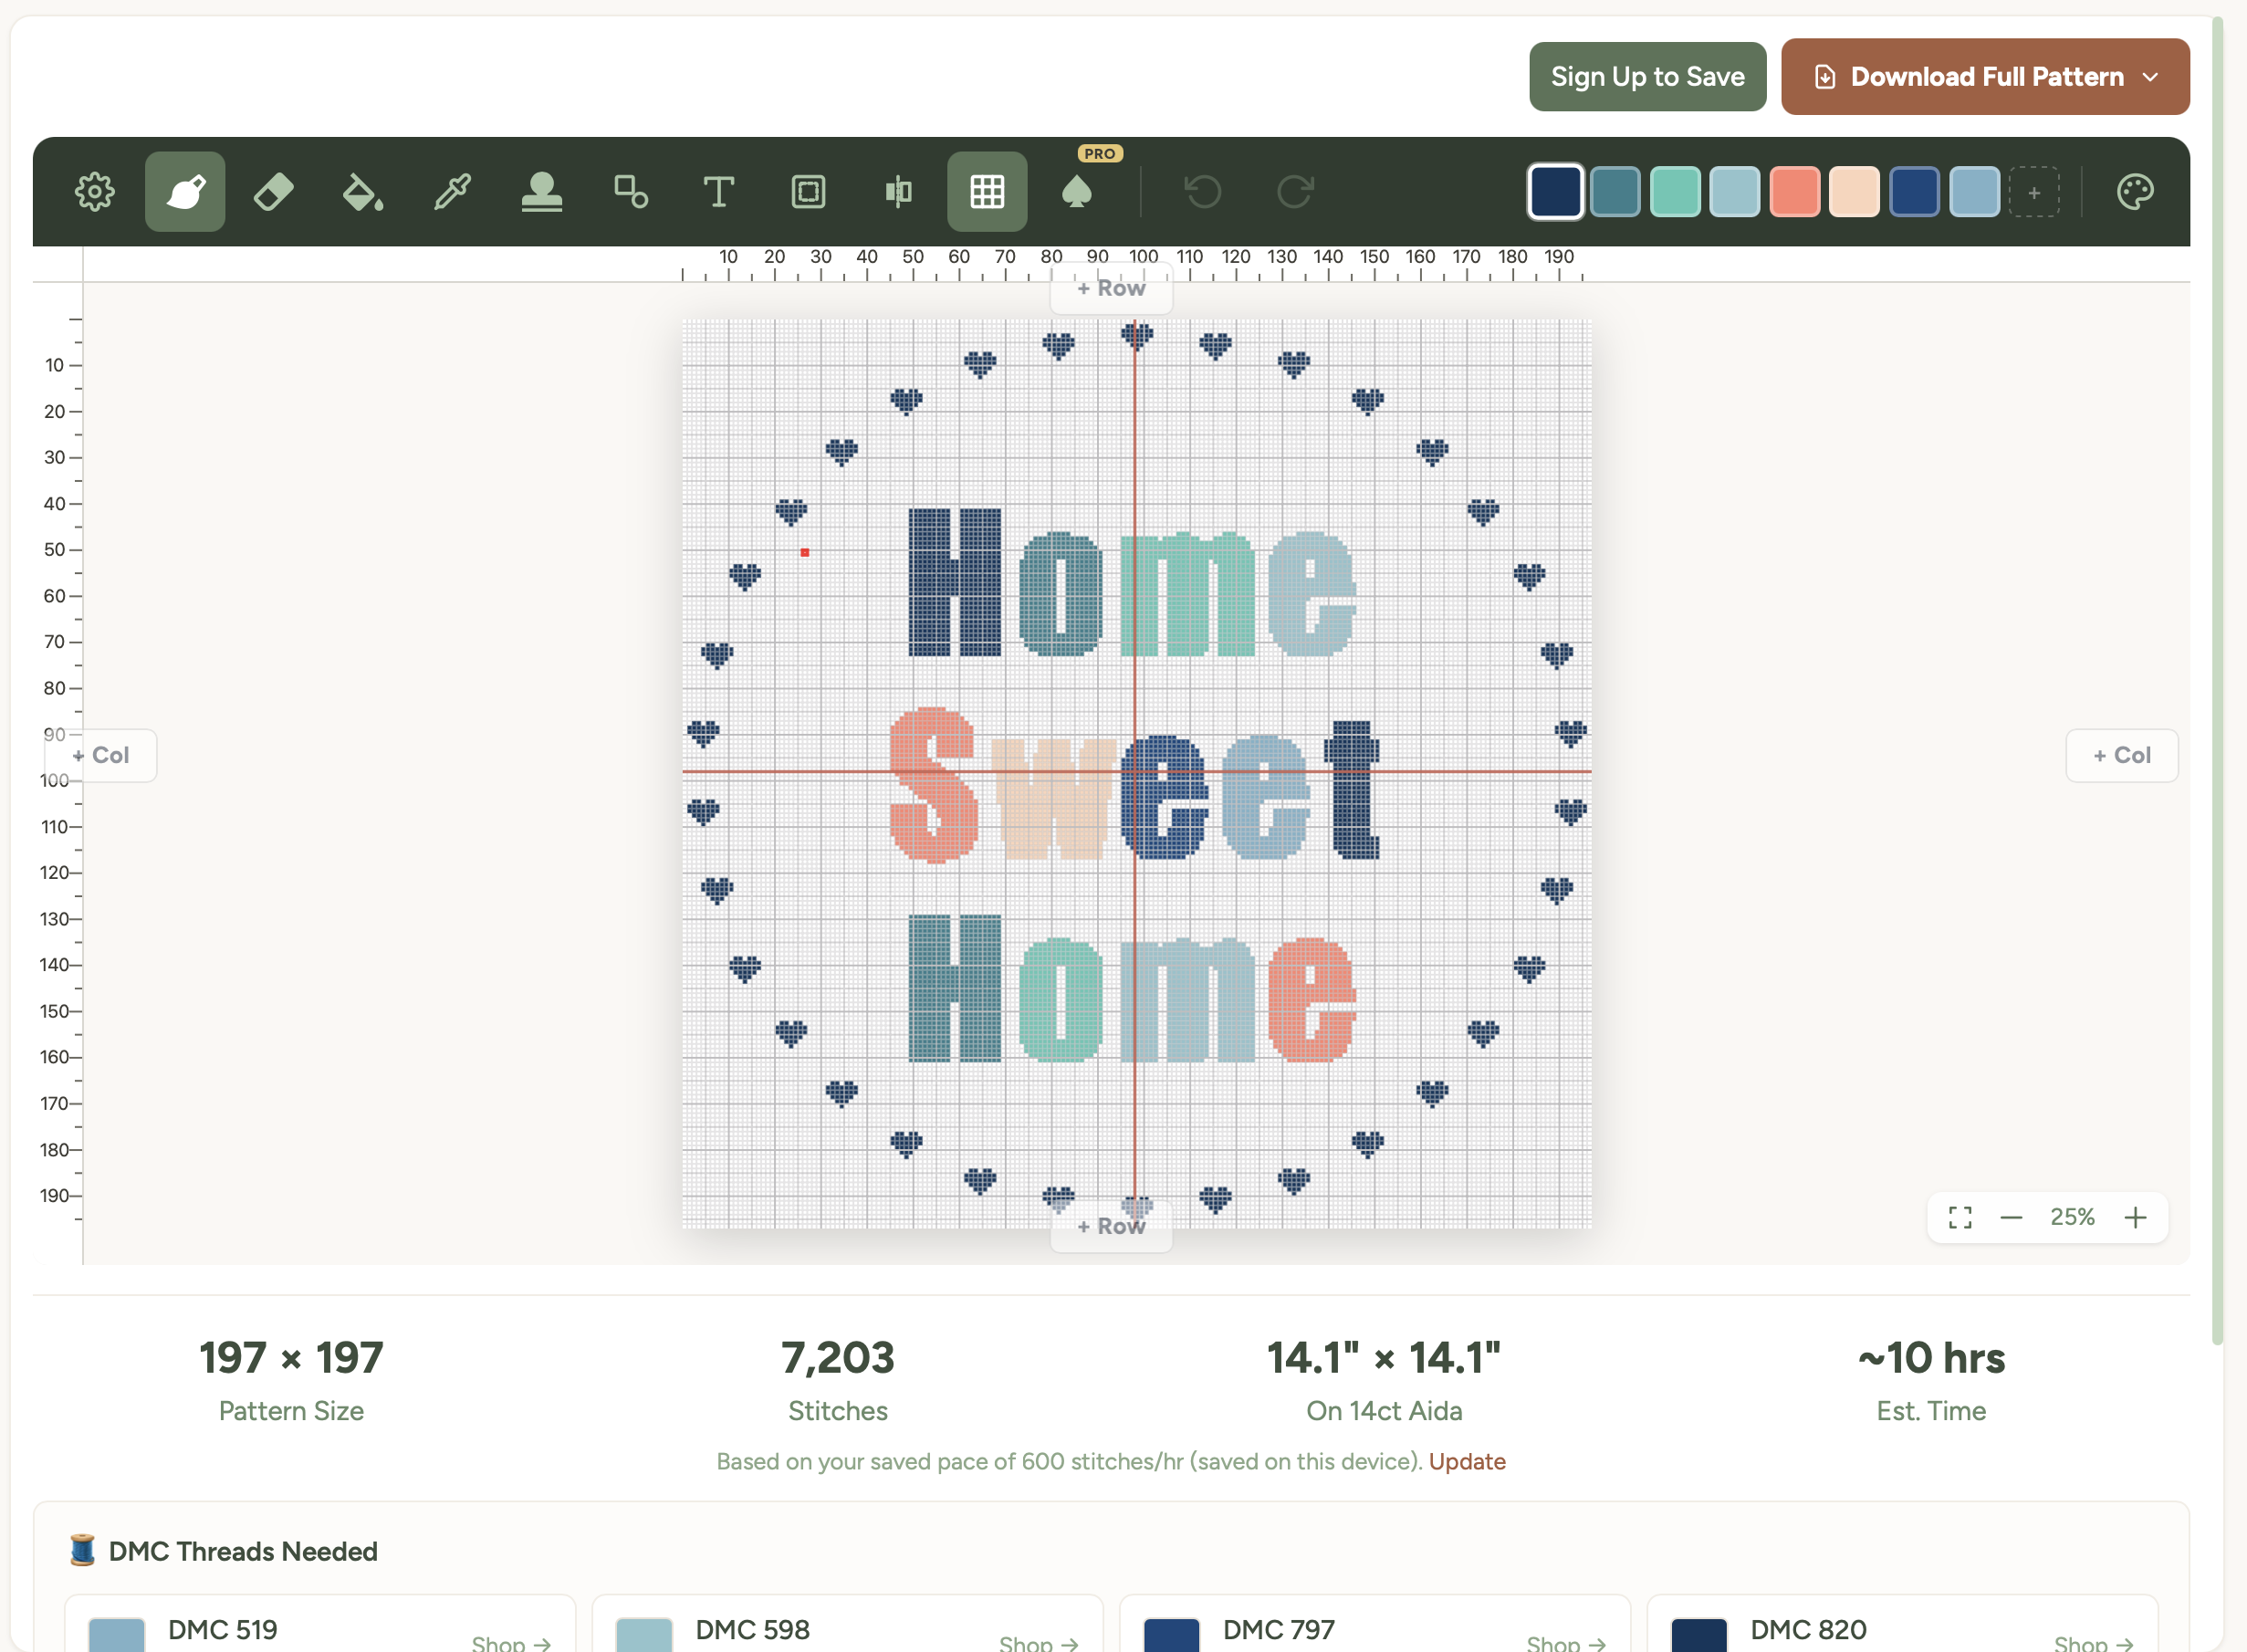
Tip: Shorter text works best for cross-stitch. A single name, a date, or a short phrase like "Home Sweet Home" will give you a much cleaner, more stitchable result than a long sentence.
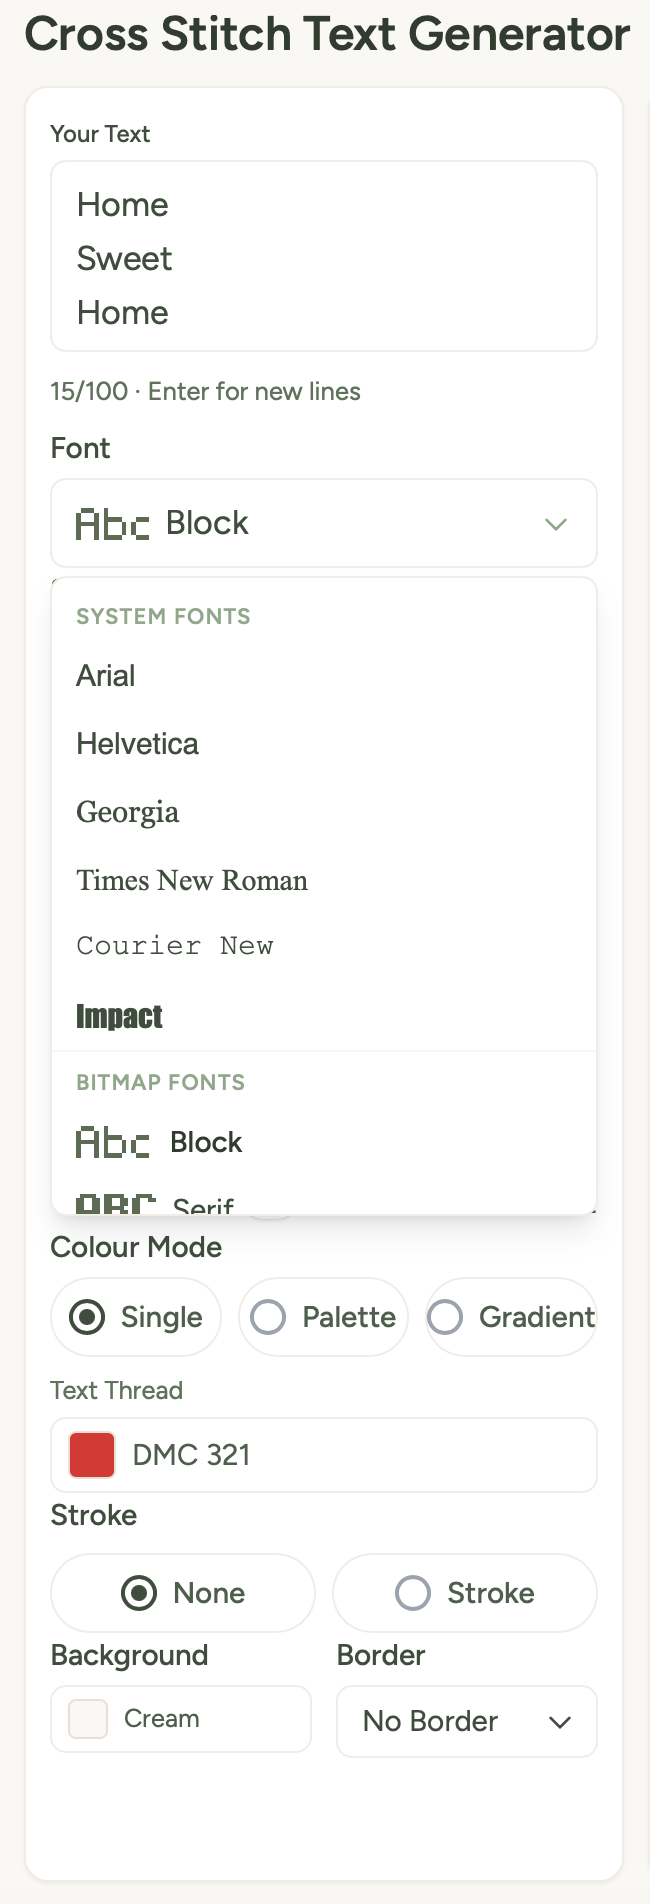
Choosing a font
The font selector shows you all the available cross-stitch font styles - there are over 40 to choose from, organised into groups:
- System fonts - familiar faces like Arial, Helvetica, Georgia, Times New Roman, Courier New, Impact, and Multilingual Sans. These are rendered at whatever size you set with the Font Height slider.
- Multilingual lettering - Multilingual Sans and Unicode fallback rendering support accented Latin text, Cyrillic, Greek, Chinese, Japanese and Korean characters. Arabic characters can be rasterised too, but short words are usually cleaner than long connected phrases on a stitch grid.
- Bitmap fonts (free) - three hand-designed pixel fonts: Serif (a classic with decorative tips), Block (simple bold letters), and Mini (compact for tight spaces). These use the Stitch Size setting instead of Font Height.
- Script fonts - flowing cursive styles like Dancing Script, Great Vibes, Sacramento, and Pacifico.
- Decorative fonts - Script, Retro, Valentine, Calligraphy, Angular, Western, Sci-Fi, and Italic.
- Pixel fonts - retro game-style fonts like Press Start 2P, VT323, Pixelify Sans, and Silkscreen.
- Halloween fonts - spooky options like Creepster, Nosifer, Eater, Butcherman, and Frijole.
- Display fonts - bold statement fonts including Bungee, Monoton, Bebas Neue, Black Ops One, and more.
The system and bitmap fonts are free for everyone. The Script, Decorative, Pixel, Halloween and Display font groups are unlocked with a paid plan - you can preview all of them regardless.
Want to see all the fonts at a glance? Check out the fonts page for a full visual reference.
Size settings
How you control the text size depends on which type of font you've chosen:
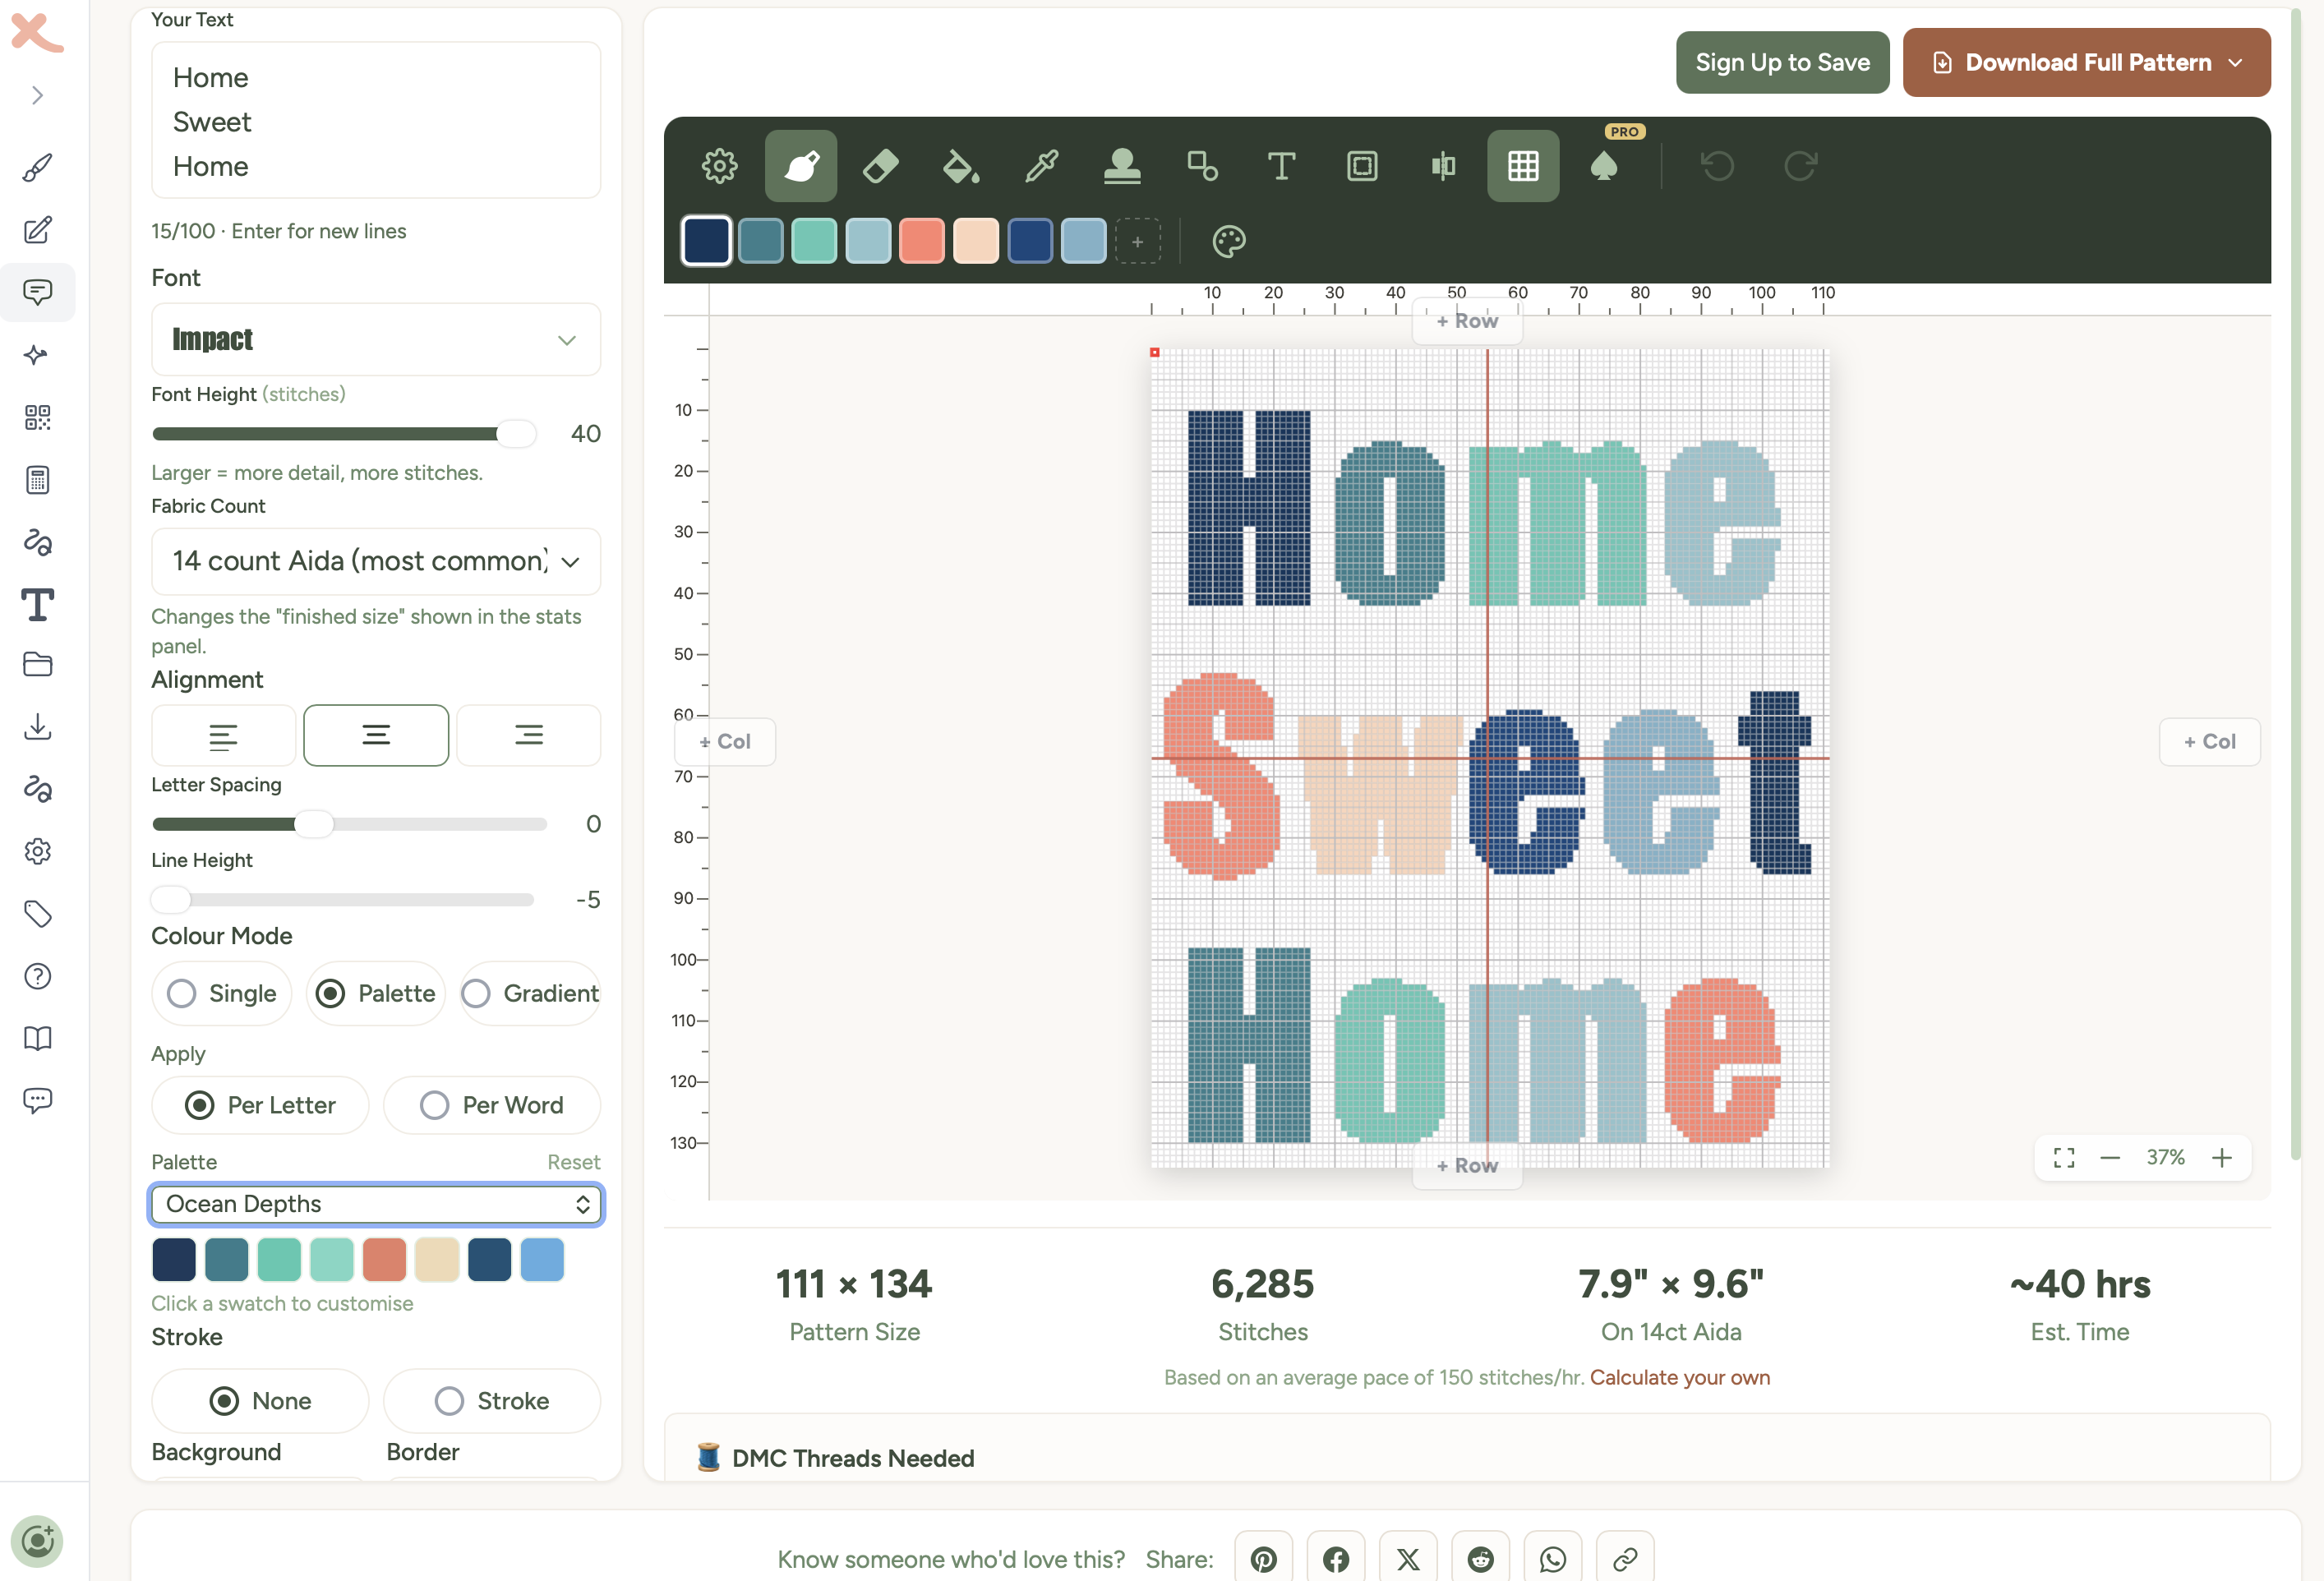
Font Height (system, script, pixel, display, and Halloween fonts)
A slider from 8 to 40 stitches tall. Larger values give you more detail but a bigger pattern. The default is 16 stitches.
Stitch Size (bitmap fonts only)
The three bitmap fonts use a simpler size control with three options:
- Small (1x) - compact, each pixel in the font design is one stitch
- Medium (2x) - recommended, each pixel becomes a 2x2 block of stitches
- Large (3x) - easy to stitch, each pixel becomes a 3x3 block
Fabric count
Choose your Aida fabric count (11 through 28, with 14 count as the default). This doesn't change the pattern itself - it updates the "finished size" shown in the stats panel so you can see how big the text will be on your chosen fabric.
Alignment and spacing
Alignment
Three options: Left, Centre, or Right. This controls how multi-line text is aligned. Centre is the default.
Letter Spacing
A slider from -4 to +6 that adjusts the gap between letters. Negative values tighten the letters together, positive values spread them apart. Default is 0.
Line Height
A slider from -5 to +10 that controls the gap between lines when you have multi-line text. Default is 2. Reduce it to bring lines closer together, increase it for more breathing room.
Colour modes
You can choose how your text is coloured:
Single colour
Pick one thread colour for the entire text. Click the colour button to open the DMC colour picker and choose from real thread colours. Classic and clean.
Palette
Apply colours from a preset palette across your text. You can pick from eight different palettes including pastels, warm tones, cool tones, and more. Two sub-options control how colours are applied:
- Per Letter - each letter gets the next colour in the palette
- Per Word - each word gets the next colour
You can also click individual swatches in the palette to customise them with any DMC colour.
Gradient
Blend smoothly between two colours from one end of your text to the other. Pick a start and end colour, or use the suggestion buttons:
- Complementary - picks the opposite colour on the colour wheel for maximum contrast
- Split Complementary - picks a colour nearly opposite for a softer contrast
All colours are matched to real DMC thread numbers, so you'll know exactly what to buy.
Stroke
Add an outline effect around your text:
- None - just the filled text, no outline
- Stroke - adds an outline around each letter. You can choose the stroke colour (any DMC thread) and the stroke width (1 to 5 stitches).
Stroke works with all font types - bitmap and canvas fonts alike.
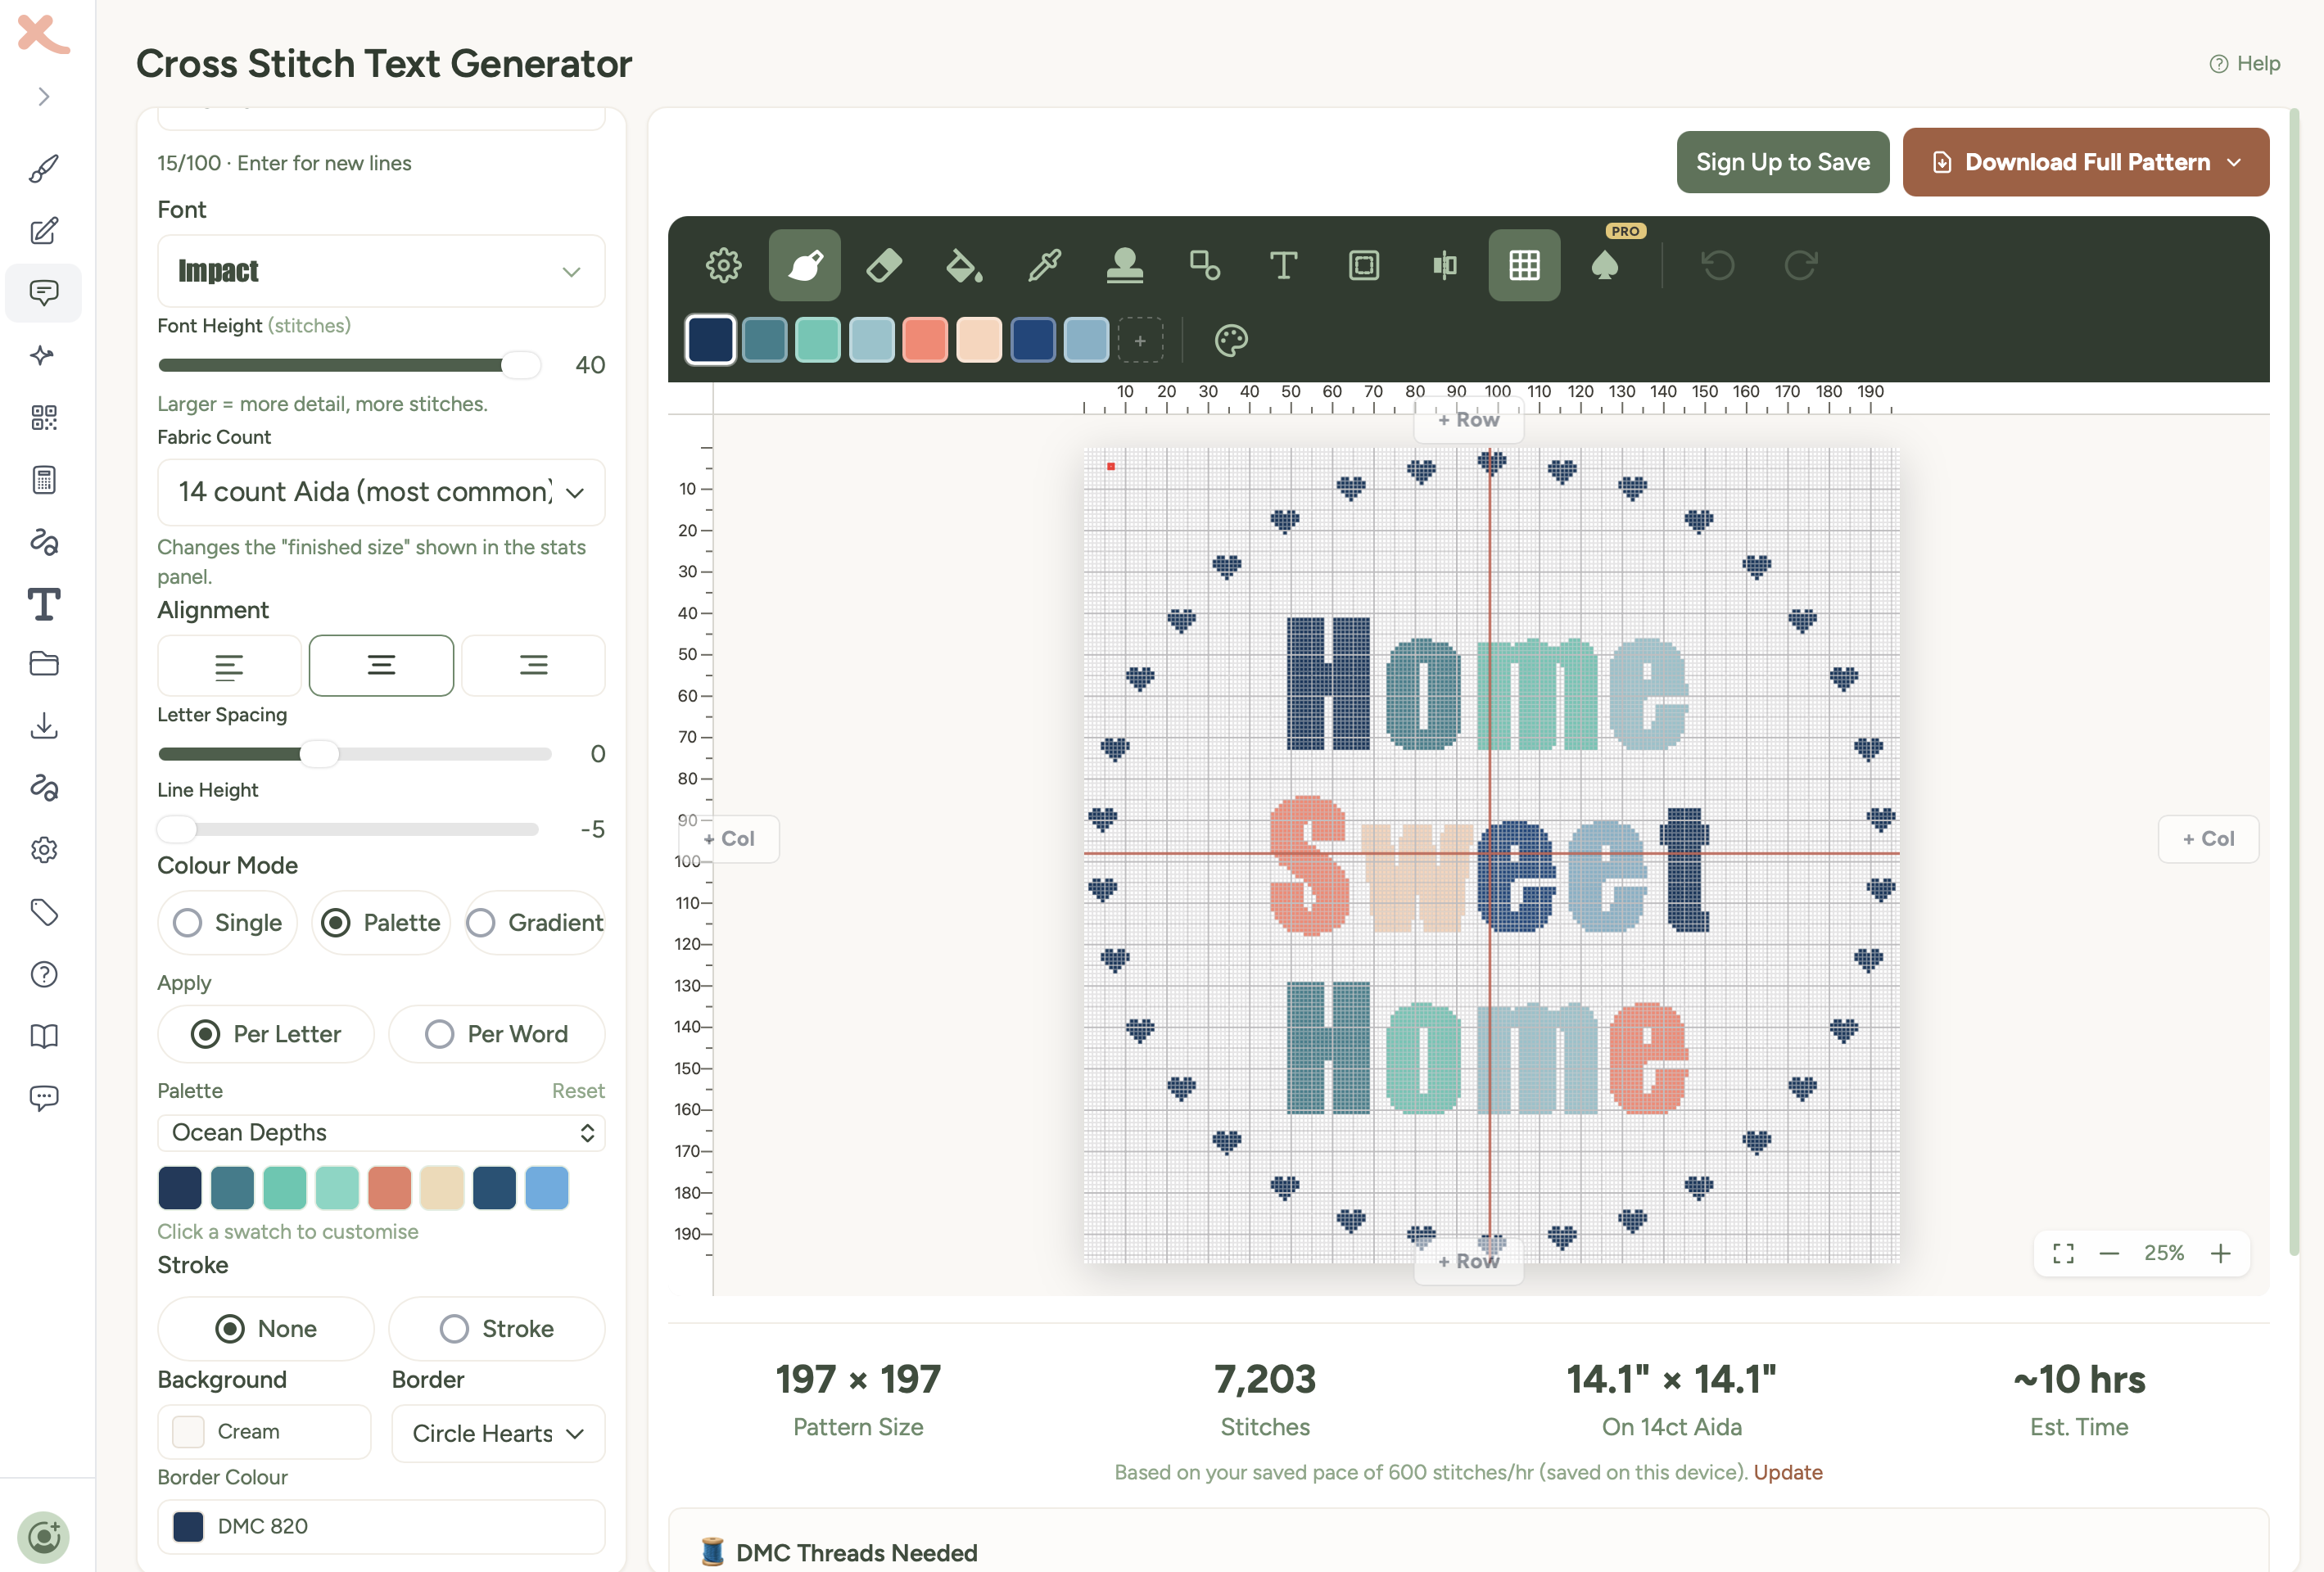
Background and borders
Background colour
Set the colour of the empty space behind your text. The default is a light cream (matching Aida fabric). Click the colour button to change it to any colour you like.
Border
Add a decorative border around your text pattern. There are over 20 options:
- Basic borders - Simple Line, Double Line, Hearts, Diamonds, Zigzag
- Circle borders - Circle, Circle Double, Circle Thick, Circle Hearts, Circle Stars, Circle Flowers, Circle Diamonds, Circle Crosses
- Alternating borders - seasonal and themed patterns including Winter Sparkle, Halloween, Garden Blooms, Hearts & Stars, Spooky, and Nature
When you select a border, a colour picker appears to choose the border colour. Alternating borders show a second colour picker so you can set both colours in the pattern.
Desktop vs mobile layout
On desktop, the Text Generator uses a side-by-side layout. Your settings panel sits on the left (about 300px wide) with the live preview and editor taking up the rest of the screen. Changes update in real time as you adjust settings - there's no need to click Generate after the first time.
On mobile, the layout switches to a simplified view. Initially you see just the text input and Generate button - all the advanced settings are hidden to keep things simple. After generating, the editor sticks to the top of the screen and settings are organised into tabs below: Settings, Info, and About. This keeps everything accessible without cramping the small screen.
Saving and downloading
Once you're happy with your text pattern:
- Click Save to My Patterns to keep it in your account for later.
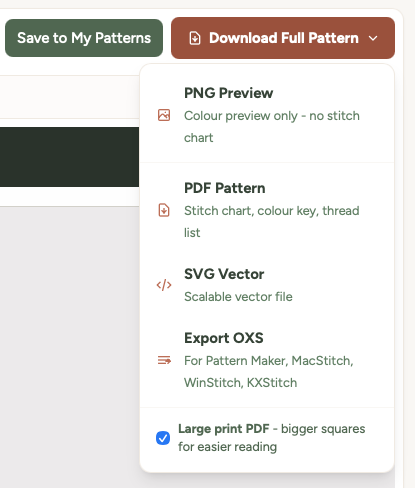
- Or click Download Full Pattern to grab the pattern right away as a PDF or PNG.
- The PDF includes the full chart with symbols, a thread colour key, and stitch counts - everything you need to start stitching.
Tips for great text patterns
Keep it short. Cross-stitch letters take up more space than you'd think. "Love" works brilliantly. "All you need is love and a cup of tea" might be a bit ambitious for a bookmark.
Try different fonts. The same word can look completely different in a block font vs a script font. Have a play - it only takes a second to switch.
Single-colour text is timeless. While gradients and palettes are fun, a simple dark thread on light fabric is the classic cross-stitch look for good reason. It's elegant and easy to stitch.
Use line breaks. For longer phrases, press Enter to split text across multiple lines. "Home / Sweet / Home" stacked vertically often looks better than all on one line.
Try a border. Adding a simple border or a circle border can turn a plain text pattern into something that looks like a finished sampler. The alternating borders are especially nice for seasonal pieces.
Large print PDF for easier reading
If you find the standard pattern chart hard to read while you're stitching - whether that's because of dim lighting, tired eyes, low vision, or just preferring bigger squares - turn on the Large print PDF option before downloading.
You'll find the toggle inside the Download Full Pattern dropdown menu, just below the file format options. Tick it, choose whether you want a colour or black-and-white chart, then click PDF Pattern.
What changes in large-print mode
- Squares are about 5mm wide - roughly twice the area of the standard chart, matching commercial large-print cross stitch publications.
- Grid numbers, page headers, and the thread colour list all scale up so the whole document reads consistently.
- The pattern splits across more pages to keep the squares big - typically 1.5x to 2x as many pages as the standard download.
- The chart style choice still applies - download either colour pages or black-and-white symbol pages.
The downloaded file name starts with large-print- so you can tell it apart from the standard one in your downloads folder.
Tip: Large-print PDFs work well printed on bigger paper too - try A3 if your printer supports it, or take the file to a print shop. Each page is laid out for US Letter / A4 by default but scales cleanly.
Was this guide helpful?
Still need help?
Send us a message and we'll get back to you as soon as we can. You can also reply to any email from Xstitchify.