A backstitch alphabet is a counted cross stitch font made from straight line stitches instead of solid colour blocks. The letters are stitched as outlines on the grid, which makes them lighter, finer and more sampler-like than a filled cross stitch font. They are the natural choice for blackwork-style text, monograms, dates and decorative borders.
This guide covers what a backstitch alphabet actually is, how it differs from a filled cross stitch font, when to reach for one, and how to design your own. If you want the short version: backstitch lettering is line-based, takes up less space than filled cross stitches, and pairs well with blackwork, samplers and minimalist projects.
If you are new to stitching letters in general, start with our how to cross stitch alphabet letters guide for fabric choice, sizing and centring basics, then come back here for the backstitch-specific options.
On this page
- What is a backstitch alphabet?
- Backstitch vs filled cross stitch lettering
- A short history of line-based lettering on counted fabric
- When to choose a backstitch font over a filled font
- Backstitch alphabets available in Xstitchify
- How to design a backstitch alphabet pattern
- Project ideas for backstitch lettering
- Thread, fabric and stitch tips
- Backstitch alphabets for blackwork
- Common backstitch lettering mistakes
- Where to find free backstitch alphabet patterns
- Final thoughts
What is a backstitch alphabet?
A backstitch alphabet is a set of letters made entirely from backstitch lines on a counted grid. Each letter is a sequence of short straight stitches joined corner to corner, rather than the X-shaped cross stitches that fill solid block letters. Stitched on Aida or evenweave, a backstitch alphabet reads as fine outline lettering, with the fabric showing through inside each character.
The pattern itself is laid out the same way as any other counted chart. A grid is overlaid on the fabric in your head, each letter has a fixed bounding box, and you work the line segments from intersection to intersection. The difference is that there are no coloured squares to fill - only paths to trace.
This makes backstitch alphabets particularly useful when you want lettering that does not dominate the rest of the design. A name worked in a 6 by 10 backstitch font occupies the same grid space as the same name in a filled font, but uses a fraction of the thread and reads as much finer.
Backstitch vs filled cross stitch lettering
The two styles look different enough that the choice between them affects the whole feel of a piece.
Filled cross stitch fonts build each letter from full X-shaped stitches. The letters look solid and weighty. Coloured fonts are easy to see from across a room. They suit bold quotes, kitchen signs, statement pieces and anywhere the lettering is meant to be the focus.
Backstitch fonts build each letter from straight line stitches between grid intersections. The letters look light, drawn and outline-based. They suit samplers, monograms, dates inside a larger design, blackwork borders and any project where the lettering is part of the decoration rather than the main subject.
Practically, you can mix the two on the same chart. A filled-cross-stitch headline at the top of a piece paired with a backstitch border alphabet of dates and initials below it is a common sampler layout. The eye reads the filled lettering first and the backstitch lettering as supporting detail.
For a deeper comparison of the two styles, see the full cross stitch fonts catalogue, which shows filled and backstitch options side by side.
A short history of line-based lettering on counted fabric
Counted-thread lettering has been around for as long as samplers have. Early European samplers, including band samplers from the seventeenth century onwards, used line-stitched alphabets to record what a stitcher knew and to demonstrate proficiency to anyone holding the work. Many of those alphabets were stitched in backstitch or double running stitch rather than full cross stitch, partly because the thread was expensive and partly because the maker wanted neat, legible characters that did not dominate the rest of the band.
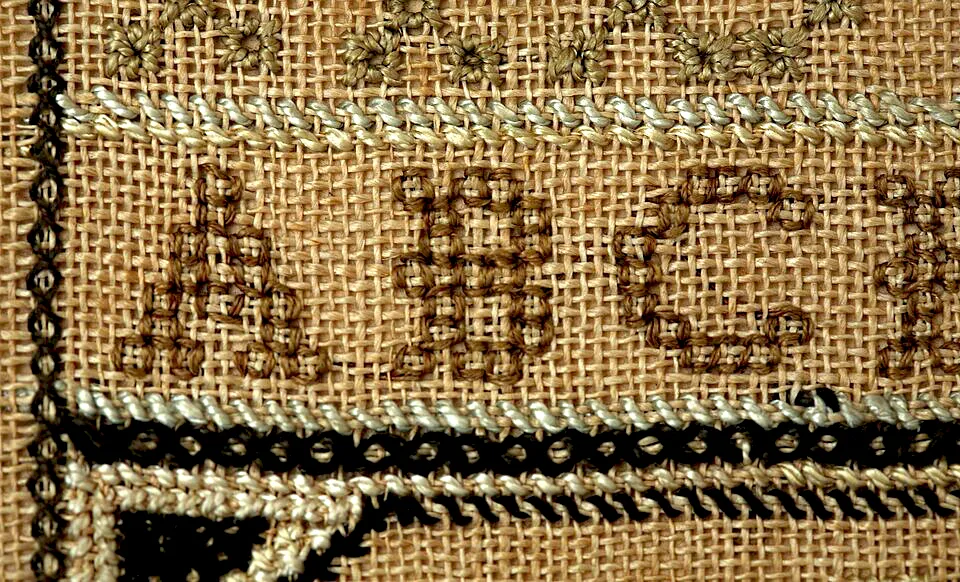
 Detail of Mary Keeler’s antique needlework sampler. Cross stitched characters sit between rows of counted backstitch linework, with the floral border worked in heavier decorative stitches above - a textbook example of how stitchers historically combined filled cross stitches with outline backstitch on the same piece. Image via Wikimedia Commons (public domain, Digital Public Library of America).
.jpg)
The technique sits closely alongside blackwork embroidery, which is the broader counted-thread style most associated with line lettering. Tudor and Stuart blackwork pieces used Holbein stitch (double running stitch) for lettering and motifs because the work was reversible, which mattered for collars, cuffs and book covers that were visible on both sides.
The modern habit of calling these letters “backstitch fonts” is a convenience. In counted-thread embroidery, the line stitches are usually backstitch or double running. Cross stitch designers tend to chart them as backstitch and let the stitcher pick whichever line stitch they prefer.
When to choose a backstitch font over a filled font
A few situations where backstitch lettering is the right call:
- Sampler alphabets. Sampler bands are traditionally line-based, and a backstitch alphabet sits comfortably between rows of motifs without overwhelming them.
- Monograms and initials. Two or three initials in a backstitch font sit cleanly inside a wreath, frame or decorative border without fighting for space.
- Blackwork text. Blackwork patterns lean heavily on linework, so a filled cross stitch font feels out of place. A backstitch alphabet is the natural match.
- Dates and signatures. Most stitchers want their date and initials to read as a discreet signature, not as a billboard. Backstitch fonts handle this with very little fabric real estate.
- Borders that wrap around a piece. A long line of text running around the edge of a chart works better in line lettering than in filled lettering, which can look heavy as a frame.
- Lower-count fabrics. On 11-count Aida, filled lettering can look chunky. Backstitch lettering gives you finer characters even when the grid is coarse.
There is no rule that says you have to commit to one style. Many designs use a filled font for the main quote and a backstitch font for the supporting information.
Backstitch alphabets available in Xstitchify
The text generator includes eight backstitch alphabet styles, all available alongside the filled cross stitch fonts. They are designed to be picked up and used straight away, with the same settings (size, spacing, palette) as the filled fonts.
- Backstitch Simple - clean uppercase line letters, good as a general-purpose sampler alphabet
- Backstitch Tall - elongated capitals, useful when you want a vertical accent or a banner
- Backstitch Italic Caps - slanted line capitals with a classical feel, suits formal monograms
- Backstitch Modern - contemporary line letters, sleek enough for modern sampler designs
- Backstitch Embossed - double-line decorative letters, good for ornate borders and decorative initials
- Backstitch Angular - sharp geometric letters, the most blackwork-friendly of the set
- Wide Modern - wider sans-serif line letters with more horizontal weight, suits headline sampler text and statement monograms
- Curly Caps - flourished decorative capitals with curled tips, good for wedding monograms, decorative initials and fancy sampler titles (Pro)
Each style is previewed in the cross stitch fonts gallery, and any of them can be opened directly in the text generator with a single click.
If you want a backstitch alphabet outside the six built-in styles, Standard and Pro subscribers can upload their own TTF or OTF fonts and convert them to a stitchable backstitch pattern. The font is rasterised onto the grid in line-stitch form and saved to your account for reuse.
How to design a backstitch alphabet pattern
A practical workflow looks like this. Open the cross stitch text generator, type the word or phrase you want to stitch, then choose one of the backstitch fonts from the picker. Adjust the size (small for monograms and dates, larger for sampler bands) and the spacing between characters. The grid preview updates as you type so you can see how the text will sit on fabric before you generate the pattern.
Once the lettering looks right, you can either download the chart as a PDF or push it through to the pattern editor to combine it with motifs, borders and other stitches. The editor handles backstitch and cross stitch on the same canvas, so you can layer a backstitch alphabet alongside filled stitches without switching tools.
A few specific points to watch:
- Character spacing matters more for line lettering than for filled lettering. Letters that touch each other on the grid will visually merge when stitched, especially for fonts with thin verticals.
- Letter height should be at least 6 stitches for backstitch alphabets on 14-count Aida. Below that the lines start to crowd and individual letters become hard to read.
- Line direction. Wherever possible, design your text so the backstitch lines travel in long runs rather than tight zigzags. Each direction change adds a thread anchor on the back and slows you down.
For longer projects, place the lettering first and design the rest of the chart around it. Lettering is the part of a sampler that gets noticed first and counted most carefully, so getting it positioned before you fill the rest of the canvas saves rework later.
Project ideas for backstitch lettering
Specific use cases where a backstitch alphabet does the work better than a filled font:
- Wedding samplers. Couple’s names, wedding date and venue in Backstitch Italic Caps inside a floral or geometric frame.
- Baby announcements. Name, weight and birth date in Backstitch Simple beside a small motif. The line lettering keeps the focus on the motif without losing legibility.
- Cross stitch bookmarks. A name or initial at the top of the bookmark in Backstitch Tall, with the long shape of the bookmark suiting tall narrow letters.
- Quaker-style samplers. Stacked rows of capitals, alphabets and dates, all in line lettering, which is how Quaker samplers historically work.
- Monogrammed gifts. Two or three initials in Backstitch Embossed, mounted small in a hoop or framed.
- Blackwork bands. Geometric blackwork borders alternated with rows of Backstitch Angular lettering.
- Date stamps on larger pieces. Stitch the year and your initials in a small backstitch font in the bottom corner of a finished cross stitch as a discreet signature.
A blank backstitch sampler with just an alphabet and a date is also a sensible practice project. It teaches you how line lettering counts on the grid before you commit to a larger design.
Thread, fabric and stitch tips
A few practical notes that affect how backstitch lettering looks when stitched:
Thread count. Two strands of stranded cotton on 14-count Aida is the usual default for backstitch lettering, and it works well for most projects. One strand looks more delicate but can be hard to read on coarser fabrics. For 16-count or 18-count Aida, one strand is often enough. On 28-count evenweave worked over two threads, two strands of stranded cotton matches the line weight you would get on 14-count Aida.
Fabric. Aida is the easiest starting point because the grid is visible. Evenweave and linen give a more refined finish and suit the historical sampler look. Use the fabric calculator to plan finished sizes before cutting.
Stitch choice. Backstitch is the default, but you can also work backstitch alphabets as double running stitch (Holbein stitch) if you want the back of the work to look as neat as the front. Holbein stitch is slower but reversible, which matters for bookmarks, ornaments and anything where both sides of the fabric will be visible.
Colour. A single dark thread on pale fabric is the traditional sampler look and reads cleanest. Backstitch lettering in a bright colour can look unfinished against busier designs, so save bright lettering for short single-line projects rather than long sampler text.
Backstitch alphabets for blackwork
Blackwork and backstitch lettering are closely related. Most blackwork charts include some kind of line-based alphabet, either as a sampler band, as a date, or as the maker’s initials.
If you are designing a blackwork cross stitch pattern, reach for one of the angular or simple backstitch fonts rather than a filled font. Backstitch Angular and Backstitch Simple work particularly well because they stay legible against busy geometric fills without competing with them.
A typical blackwork sampler layout uses backstitch alphabets in two places: as a row of capitals near the top or bottom of the piece, and as a smaller dated initial set in one corner. Stacking these vertically with rows of geometric fill in between gives you a balanced traditional sampler without much extra work.
For the historical background on the broader technique, see our guide to what is blackwork cross stitch.
Common backstitch lettering mistakes
A few mistakes show up over and over in beginner backstitch lettering:
Letters that are too small. Backstitch lettering needs room to read. Letters that are only 4 or 5 stitches tall often blur together on 14-count Aida. Six stitches is a safe minimum.
Spacing that is too tight. A backstitch alphabet uses thin lines, so the spacing between letters needs to be at least one full stitch wide. Anything less and adjacent letters merge visually.
Lettering placed too close to filled stitches. If the backstitch lines run right up against a block of cross stitches, the eye loses the difference between them. Leave at least one stitch of clear fabric between filled and line areas.
Inconsistent line weight. Mixing one-strand and two-strand backstitch in the same alphabet looks scruffy. Pick one strand count for the lettering and stick with it for the whole piece.
Stitch direction that changes constantly. Designs that zigzag every stitch are slow to work and harder to keep neat. Aim for line runs of three or four stitches before a direction change where possible.
Skipping a test stitch. Backstitch lettering reads differently on the grid than it does on fabric. Always stitch one or two test letters before committing to a long piece, particularly if you are working on an unfamiliar count.
Where to find free backstitch alphabet patterns
Some practical routes:
- The text generator itself. Generate any word in one of the six built-in backstitch fonts, download the chart as a PDF, and stitch from that. The chart is free to download once you have signed up.
- Public-domain sampler books. Older needlework books available through libraries and museum digital collections include line-stitched alphabets that are still usable today. The charting style is sometimes harder to read than modern conventions, but the letterforms are often more interesting than mass-produced alphabets.
- Designer freebies. Many sampler and blackwork designers post a small free alphabet alongside paid kits. These are usually one font, often unfinished as a complete A-Z, but useful for short projects.
- Drafting your own. A simple Roman capital alphabet can be drafted on a blank pattern grid in under an hour if you only need the letters of one name or word. Once drafted, the same alphabet can be reused across multiple projects.
If you are using a backstitch alphabet from elsewhere, check the chart symbols carefully before stitching. Backstitch notation varies by designer, and a line drawn at a specific angle on one chart might mean something different on another.
Final thoughts
Backstitch alphabets are a quiet, useful tool. They are not the headline feature of any sampler, but they are how dates, names and signatures get added to finished work without overwhelming the design.
If you are starting out, work a small sampler band with a single backstitch alphabet to learn how the letters count on the grid. Once you are comfortable, mix backstitch lettering with filled cross stitch motifs, blackwork borders and other elements. The two styles complement each other and most sampler-style projects use both.
To try the built-in backstitch fonts, open the cross stitch text generator, pick a backstitch style from the font menu, and type any word. The chart updates instantly. Browse the full cross stitch fonts gallery if you want to compare all the line and filled options side by side.