A cross stitch mandala looks complicated at first, but the design process is mostly about structure: start from the centre, repeat small shapes, keep your spacing even, and make colour choices that support the symmetry.
This guide walks through what a cross stitch mandala actually is, where the style comes from, and a practical workflow for designing a stitchable mandala chart, whether you want a small hoop design, a geometric sampler centrepiece, or a decorative pattern to build around motifs and borders.
On this page
- What is a cross stitch mandala?
- Where the cross stitch mandala style comes from
- Start with the finished size
- Mark the centre first
- Build one ring at a time
- Use symmetry without making the chart stiff
- Choose a stitchable colour palette
- Add motifs and stamps carefully
- Keep the outer edge intentional
- Small, medium and large mandala project ideas
- Common cross stitch mandala mistakes
- Check the chart before stitching
- A simple mandala workflow
- Where to find free cross stitch mandala patterns
- Final thoughts
What is a cross stitch mandala?
A cross stitch mandala is a counted pattern built around radial symmetry, repeated motifs and a clear centre point. The shapes radiate outwards in rings or quadrants so the design feels balanced from every direction, which is the defining characteristic of the mandala style in any medium.
In practice, that means a cross stitch mandala usually has:
- a strong central motif - a star, flower, diamond or geometric shape
- one or more rings of repeated motifs around the centre
- visible symmetry, often four-way or eight-way
- a finished outer edge or border that closes the design
- a controlled palette where colours echo around the rings
Mandalas can be detailed and dense or minimal and graphic. Some are tiny enough to fit in a 4-inch hoop. Others fill a full square frame. The defining quality is symmetry: if you turn the pattern ninety degrees, it should still feel balanced.
Where the cross stitch mandala style comes from
The word “mandala” comes from Sanskrit and means circle or disc. The shape has religious and meditative meaning in Hindu and Buddhist traditions, where it represents wholeness and the universe. The visual style - circular, symmetrical, organised in rings - has been adopted into a wide range of secular crafts over the last fifty years, including adult colouring books, tattoo design, mosaic, quilting, and counted needlework.
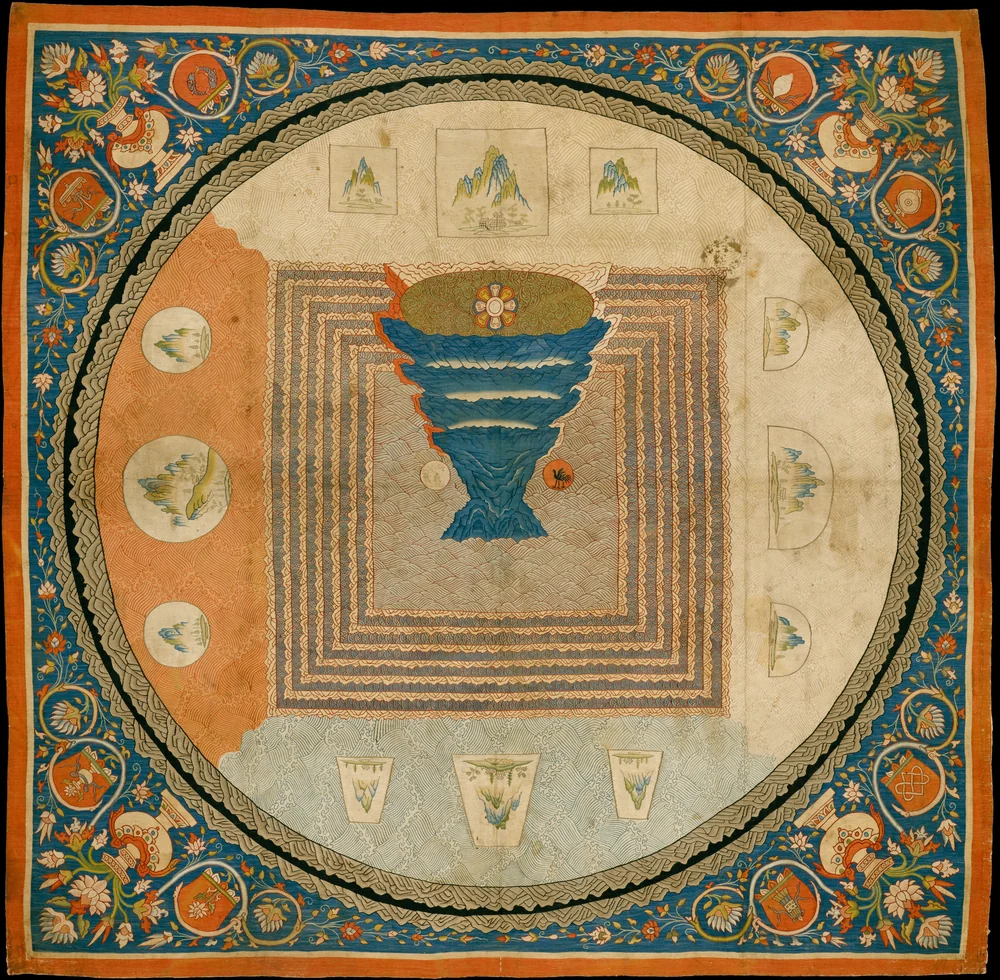 “Cosmological Mandala with Mount Meru”, Yuan dynasty (14th century) Chinese silk tapestry, Metropolitan Museum of Art. The radial structure - centre point, concentric rings, nested squares - is the same logic a counted cross stitch mandala uses. Image via Wikimedia Commons (public domain).
For more on the symbolism, history and visual conventions of the mandala across traditions, see Wikipedia’s mandala article.
Cross stitch mandalas are a relatively recent application of the style. They borrow the radial structure and let stitchers translate it onto a counted grid. The counted format actually suits mandalas well because the grid forces the design into a tidy geometric framework, which is exactly what mandalas rely on visually.
Most modern cross stitch mandalas are designed for decoration rather than spiritual practice, although some stitchers describe the slow, repetitive process of working a mandala chart as meditative in its own right. The repeated motifs and predictable structure make them a good “comfort stitch” project - easy to pick up, hard to get lost in.
Start with the finished size
Before drawing the mandala, decide how big the finished piece should be. Mandalas usually work best on a square canvas because the design grows evenly from the centre.
Good starting sizes:
- 40 x 40 stitches for a small hoop, coaster or card
- 70 x 70 stitches for a medium mandala with several rings
- 100 x 100 stitches for a more detailed wall piece
- 150 x 150 stitches for a large, dense centrepiece
The stitch count is not the same as the finished fabric size. A 70 x 70 pattern on 14-count Aida is about 5 inches square before margins. The same stitch count on 18-count fabric is smaller. Use the cross stitch fabric calculator before you commit so you know how much fabric to cut.
Mark the centre first
Mandala cross stitch patterns need a reliable centre point. If your canvas is 70 x 70 stitches, the centre sits between stitches 35 and 36. If it is 71 x 71, there is a true centre stitch.
Either approach works, but it changes how the design feels:
- Odd stitch counts give you a single centre stitch, which is useful for stars, diamonds and floral centres.
- Even stitch counts give you a centre line, which is useful for mirrored geometric layouts.
If you are drawing in the cross stitch mandala designer, start with a square grid and build the first motif around that centre before adding outer rings.
Build one ring at a time
The easiest way to design a mandala is in rings:
- Centre motif
- First ring of repeated shapes
- Spacing ring or border
- Second ring of larger motifs
- Outer frame or decorative edge
This keeps the pattern controlled. It also makes the chart easier to stitch because each section has a clear relationship to the next one.
Try simple repeated shapes first:
- diamonds
- crosses
- stepped triangles
- flowers
- stars
- leaves
- small hearts
- square borders
You do not need every ring to be busy. Empty space is useful in cross stitch mandalas because it stops the chart becoming heavy and gives the repeated shapes room to breathe.
Use symmetry without making the chart stiff
Symmetry is what makes a mandala feel balanced, but it does not mean every stitch has to be copied mechanically. A good mandala can repeat the same shape in four corners, mirror a border from top to bottom, or use the same colour sequence on each side.
For a simple counted cross stitch mandala, use one of these structures:
- Four-way symmetry: the top, bottom, left and right sections match.
- Eight-way symmetry: the design is mirrored across four axes, giving a snowflake-like feel.
- Diagonal symmetry: the corners mirror each other.
- Radial feel: repeated motifs sit around the centre like petals, even though they are built on a square grid.
When in doubt, repeat fewer things more clearly. One strong motif repeated eight times will usually stitch better than eight unrelated motifs fighting for attention.
The symmetry tool in the pattern designer makes this much faster - turn on four-way or eight-way symmetry before you draw and every stroke is mirrored across the canvas automatically.
Choose a stitchable colour palette
Mandalas can handle colour, but too many thread colours can make a small design frustrating. A palette of 4 to 10 colours is often enough.
Useful palette structures:
- Monochrome: one colour plus empty fabric
- Tonal: several shades from the same colour family
- Complementary: two main colour families with one accent
- Rainbow: ordered colour changes around the rings
- Seasonal: muted autumn, fresh spring or wintry palettes that suggest a time of year
Use the DMC colour chart to choose real thread colours before finalising the pattern. If two colours look very close on screen, check their thread codes and test whether they will still be distinct when stitched. Two greens that look different in DMC’s catalogue can read as the same shade once stitched at small scale, particularly in low light.
For monochrome mandalas, a single strong colour on white or cream is hard to improve on. Black gives you graphic contrast, deep navy looks more traditional, and burgundy or forest green sits beautifully on cream linen.
Add motifs and stamps carefully
Motifs and stamps are helpful because mandalas rely on repetition. A small flower, star or diamond can become a full ring if you place it consistently around the centre.
The main rule is to leave enough space between motifs. If two motifs nearly touch, the chart can become visually muddy once stitched. If they overlap awkwardly, simplify one of them instead of forcing both into the design.
In Xstitchify, you can start from the pattern designer and use stamps, motifs, borders and hand-drawn stitches together. For mandalas, this is usually faster than drawing every repeated element from scratch.
Keep the outer edge intentional
The outer edge matters because it is what gives the mandala a finished shape. Without a frame or border, a mandala can look like it trails off.
Good outer edge options:
- a single stitched square border
- a dotted border made from tiny motifs
- a scalloped-feeling edge made from stepped shapes
- a ring of diamonds or stars
- a mostly empty border with four stronger corner motifs
If you are planning to finish the piece in a hoop, check that the outer design leaves enough blank fabric around the stitched area. The chart may look fine on screen but feel cramped when mounted.
Small, medium and large mandala project ideas
Mandalas suit a range of finished pieces. Picking the project type before you start helps you choose a sensible canvas size and palette.
Small mandalas (under 50 x 50 stitches). Good for hoop ornaments, greetings card inserts, coasters, biscornu, pincushions, fridge magnets and tree decorations. Small mandalas need to be clear and graphic rather than detailed - aim for one centre motif, one ring, and a clean outer edge.
Medium mandalas (50 to 100 stitches). Good for 6-inch and 8-inch hoops, framed pieces, sampler centrepieces, gift pieces and meditation-themed pieces. Medium mandalas can carry two or three rings of motifs and a more decorative outer border.
Large mandalas (over 100 stitches). Good for statement wall pieces, cushion fronts, framed gifts and slow-stitch projects. Large mandalas can take real complexity: four or five rings, contrasting motif scales, a substantial border, and a richer palette. Keep in mind that a 150 x 150 mandala is roughly 22,500 stitches, so the project will take dozens of hours even with a clean chart.
Mandala kits are a popular gift idea, but you can usually design something more personal in the same time it takes to order one. A small monochrome mandala with a recipient’s initial worked into the centre is a quick and meaningful project.
Common cross stitch mandala mistakes
A handful of mistakes show up repeatedly in beginner mandala designs. Knowing them ahead of time saves a lot of unpicking.
Centre that drifts. If the central motif is not truly centred on the canvas, every outer ring will be off too. Mark the centre stitch or centre line clearly before you draw anything else.
Repeats that do not align. Counted symmetry needs to land on the grid exactly. A motif that is mirrored “by eye” rather than by stitch count will always look slightly wrong. Use the symmetry tool rather than freehand mirroring.
Too many fills competing for attention. A mandala with five different fill patterns can feel busy. Three is usually enough, with one of them dominant.
No breathing room. Mandalas need empty space to read as mandalas. Filling every ring with motifs makes the design look like a solid disc rather than a layered pattern.
Colours that read as the same shade. Pick palette colours that are visibly distinct at stitch scale. Two near-neighbouring greens or two pale pinks often blur together once stitched.
Outer edge that does not close the design. A mandala that simply stops at the edge of the motif looks unfinished. Always plan an outer ring, border or empty frame.
Check the chart before stitching
Before downloading or stitching the full pattern, zoom out and ask:
- Does the centre feel centred?
- Do the repeated motifs line up?
- Are there awkward single stitches that do not add anything?
- Are the colours distinct enough?
- Is there enough blank space?
- Will the finished size work on the fabric count I want?
This is the point where a few edits make the biggest difference. Remove isolated stitches, simplify crowded areas, and make sure each ring has a clear job.
A simple mandala workflow
Here is a good first project:
- Open the cross stitch mandala pattern designer.
- Choose a 70 x 70 stitch canvas.
- Mark the centre.
- Turn on four-way symmetry.
- Draw a small diamond or flower in the middle.
- Add one ring of repeated shapes around the centre.
- Add a simple border ring.
- Choose 4 to 6 DMC colours.
- Check the finished size with the fabric calculator.
- Download the chart and stitch a small test section.
Once that feels comfortable, try a larger canvas with more rings, more motifs, or a mixed palette.
Where to find free cross stitch mandala patterns
If you want to stitch a mandala without designing one from scratch, there are a few routes to free charts:
- Many independent designers post a small free mandala chart on Instagram, Substack or Patreon alongside their paid work. Search “free cross stitch mandala pattern” and check the posting date - active designers tend to refresh free patterns each season.
- Public domain geometric and decorative pattern books from the late nineteenth and early twentieth century are available through library digital archives. They are not labelled as mandalas, but the symmetrical geometric designs translate well to a counted grid.
- Designing your own remains the fastest route once you have stitched two or three small mandalas. A counted 40 x 40 mandala can be drafted in twenty minutes using the symmetry tool, and you can adjust it to any palette you like.
If you are using a free pattern from elsewhere, double-check the symbol legend. Some designers use full cross stitches throughout, others mix in backstitch outlines, and a few use half stitches or three-quarter stitches that require slightly different counting.
Final thoughts
The best cross stitch mandalas are not necessarily the most detailed. They are the ones with clear symmetry, stitchable shapes and colour choices that make the design easy to follow.
Start small, repeat motifs intentionally, and let the counted grid do some of the work. If you want to build one online, the cross stitch mandala designer gives you a blank grid, motif-friendly editor, DMC colours and printable chart export in one workflow.